-
 CRYPTO MINING BLOG
 - 11 Comments So far
- Download PhoenixMiner, PhoenixMiner

- Cryptocurrency Miners | Cryptocurrency Mining | Guide | Mining on AMD GPU | Mining on NVIDIA GPU | New Releases | Software


PhoenixMiner – is a high performance Ethereum (ETH) and ERC20 miner with official full Windows / Linux support. PhoenixMiner is one of the most efficient and convenient miners to date, which is why it has received universal miner recognition. It is the fastest (arguably the fastest) Ethash miner (ETH, ETC, Muiscoin, EXP, UBQ, etc.) and supports AMD and Nvidia cards (including mixed mining rigs). Development fee is 0.65% (the lowest in the industry). This means that every 90 minutes the miner will mine for us, our developers, for 35 seconds.
Changes in v5.5c
- Added native kernels for AMD RX6800 and RX6900 GPUs. This is faster than
- common cores and produces a lot less legacy stock
- Updated cores for AMD Polaris, Vega and Navi GPUs that are slightly faster and use
- less energy than before when mining ETH. To use these updated kernels, you need to use
- drivers 20.5.1 or newer under Win10 or 20.10.x or newer under Linux
- Nvidia mining cards (P106, P104, etc.) Can now use belts and hardware control.
- options (power limitation, memory overclocking, maximum temperature, etc.) under Windows
- Added support for the latest driver AMD for Windows 21.1.1.
- Added a new parameter -mcdag to reset memory overclocking on Nvidia cards during
- DAG generation. This may allow you to set higher memory overclocks on your Nvidia cards.
- without the risk of damaging the DAG buffer, which could lead to excessive amounts of invalid
- promotions. Use -mcdag 1 (default 0, which means disabled) to use this
- new feature.
- The -tt option is now only for controlling fan behavior. For example. -tt 60 sets
- speed of an automatic fan with a set temperature of 60C; -tt -70 sets the fixed fan speed to 70%; and
- -tt 0 disables fan control. All of this can be specified for each GPU.
- There is a new option -hwm to control the frequency of the hardware.
- monitoring, which was also done by -tt in previous versions of PhoenixMiner.
- Added support for AMD Linux drivers 20.45-1164792 and 20.45-1188099. Use these drivers
- only if you have an RX6800 or RX6900 GPU. WARNING: Vega and Navi GPUs will not work with these
- drivers!
- Automatically install -ttli instead of -tmax if not supported later
- Driver. This will reduce the performance of the GPUs when they reach the set temperature.
- to avoid overheating
- Other minor improvements and fixes
Step by Step Guide PhoenixMiner
- Step 1. Install GPUs and set up your computer.
- Step 2 – Download the latest PhoenixMiner
- Step 3 – Get an Ethereum wallet (Mist or MyEtherWallet)
- Step 4 – Join the mining pool.
- Step 5 – Start mining!
Setting up a batch file for Ethereum
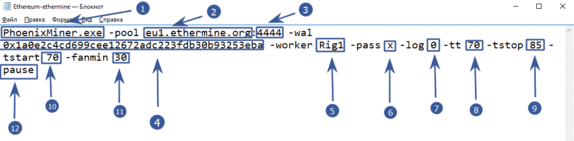
- PhoenixMiner.exe – this key indicates which program will be launched. Leave it as it is
- -pool eu1.ethermine.org – pool server. Change to another pool or leave ethermine
- : 4444 the pool port. It appears after the colon
- -wal is the address of your digital wallet
- -worker Rig1 is the name of your farm worker. Used for the convenience of tracking statistics on the pool. You can specify any
- -pass x – password on the pool. Almost never used on pools. The x value means that there is no password
- -log 0 – is responsible for maintaining the miner’s event log. 0 – means not to log. If you set -log 1 , then the log will be kept without showing debug messages on the screen, if -log 2 – write the log and display debug messages on the screen
- -tt 70 – setting the target temperature of the fan control (special values: 0 – no control on all cards, 1-4-only monitoring on all cards with an interval of 30-120 seconds, negative values - fixed speed fan (in%)
- -tstop 85 – means that the video card will be suspended when the temperature reaches 85 °
- -tstart 70 – means that the card will start again when its temperature drops to 70 °
- -fanmin 30 – the minimum rotation speed of the video card fans. if MSI Afterburner or other software does not start the fan equation
- pause – means that if you set something incorrectly, i.e. o the miner will not close immediately, but will display an error code
Setting up a batch file for dual mining Ethereum (Ethereum + Blake2s)
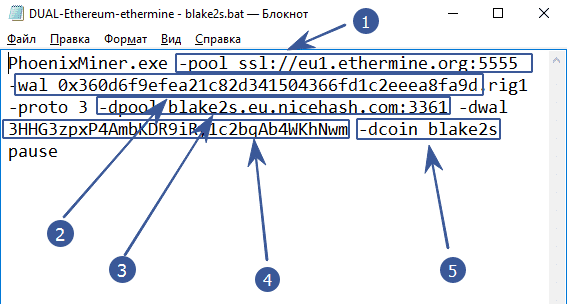
Starting from version 4.0 of PhoenixMiner, you can mine two coins at the same time. This is ideal for those with cheap electricity. Dual mode increases the power consumption and heat dissipation of video cards. Currently, only the Blake2s algorithm is supported, for example, the Verge coin works on this algorithm.
- -pool ssl: //eu1.ethermine.org: 5555 – enter the address of the pool of the first coin. The first (main) coin must necessarily work on the ethash algorithm. It will not be possible to make another algorithm the main one, as well as the Blake2s + Blake2s combination
- -wal after the -wal option, enter the address of the digital wallet of the first (main) coin
- -dpool blake2s.eu.nicehash.com:3361 enter the address of the pool of the second (for dual mining) coin. It must work on the Blake2s algorithm. It will not work to combine Ethash + Ethash in the dual (for example Ethereum and Ethereum Classic)
- -dwal – after the -dwal option, enter the address of the second coin
- dcoin blake2s option means that you will mine the second coin using the blake2s algorithm. Currently only this algorithm is supported for dual.
This is where the differences end. For completeness, you can specify additional options as in the example with Ethereum.
We recommend that you specify the parameters:
-tt 75 -tstop 85 -tstart 70 -fanmin 30 -fret 2 -rate 1In order to save video cards and protect them from overheating and any unforeseen circumstances in case of failure to start the cooler control.
Run PhoenixMiner
At the first start, the program will tell us the following information:
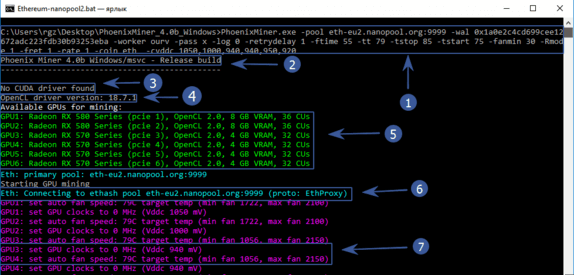
- The top line will contain everything that we specified in the batch file
- Program version
- No CUDA driver found – Nvidia driver was not found. Because we have AMD, then you shouldn’t be afraid of this inscription
- Version of your video card driver
- All available devices for mining
- The program starts connecting to the pool
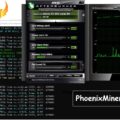
After waiting a little longer, we finally see the hash rate of video cards and other data:
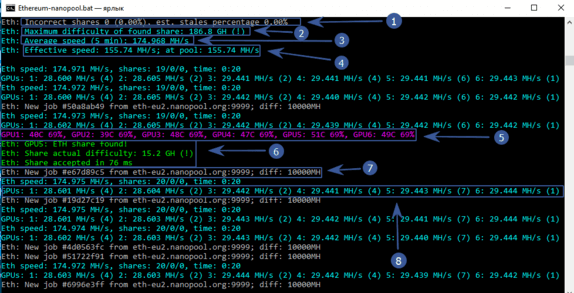
- Incorrectly resolved share 0, (0%), obsolete share is also 0%. Very good!
- The maximum difficulty of the found balls is 186.8 GH
- Average mining speed for 5 minutes – 174 Mh / s
- Effective speed – 155.74 Mh / s. Why is it smaller? Because we have just launched the program and the time of the first launch, the creation of the DAG file, etc. is taken into account. If you wait for some time, then this speed will become completely the same with an average speed of 174 Mh / s
- Temperature of each video card and fan blade speed in percent. The color scheme can be changed. See below
- Video card # 5 found a ball. I must say that miners are paid exactly for the found shares.
- Pool sent a new job and indicated the difficulty
- Hashrate of each video card separately
We have reviewed the basic settings that will already allow you to start mining. It is recommended to do the first launch with minimal or no overclocking of video cards and test PhoenixMiner for stability.
Ethereum – Ethermine.org
PhoenixMiner.exe -pool eu1.ethermine.org:4444 -wal 0x9147460980c93629e775783148591b7d0a0cbf2d -worker Rig1 -pass x -log 0 -tt 75 -tstop 85 -tstart 70 -fanmin 30 -Rmode 1 -fret 1 -rate 1 -coin eth
pause
Ethereum – sparkpool.com
PhoenixMiner.exe -pool eu.sparkpool.com:3333 -wal 0x9147460980c93629e775783148591b7d0a0cbf2d -worker Rig1 -pass x -log 0 -tt 75 -tstop 85 -tstart 70 -fanmin 30 -Rmode 1 -fret 1 -rate 1 -coin eth
pause
Ethereum – f2pool.com
PhoenixMiner.exe -pool eth.f2pool.com:8008 -wal 0x1a0e2c4cd699cee12672adc223fdb30b93253eba -worker Rig1 -pass x -log 0 -tt 75 -tstop 85 -tstart 70 -fanmin 30 -Rmode 1 -fret 1 -rate 1 -coin eth
pause
Read more:
 PhoenixMiner 4.5c: Download, Config Ethash AMD+NVIDIA GPU Miner
  PhoenixMiner 4.2a Ethereum / Ethash miner (Download and Configure)
  PhoenixMiner 4.8c (AMD & NVIDIA): Download Ethash miner for Windows & Linux.
  TT-Miner v3.2.0 Nvidia GPU miner (Step-by-step setup for Windows)
  PhoenixMiner 5.8c: Download Ethash Ubqhash ProgPOW Etchash Miner
  PhoenixMiner 5.0b: Update Addressing Support for AMD (Windows/Linux)
  TT-Miner v3.2.2 (NVIDIA GPU miner): Download for Windows & Linux.
  GMiner 1.99 (AMD/Nvidia): Download and Configure for Windows & Linux.
  GMiner v1.95 (AMD/Nvidia): Download and Configure for Windows & Linux.
  NBMiner v27.7 (Nvidia/AMD): Download and Configure for Windows & Linux.

11 Comments So far