I just want to share with you the “Antminer Monitor” that I am developing. You can check out the source code at https://github.com/anselal/antminer-monitor. It is based on Flask, a python web microframework. The app currently supports L3+, S7, S9, D3 miner models. Features include temperature tracking, fan speed, hashrate, total hashrate grouped by model. There are in-app notifications when a problem occurs. Each problem is written to a file. The log file is not currently available through the web interface, but will be available in new versions. Another requested feature is the ability to reset/unpower the miner, which will be available soon (currently being worked on). You can find more information on the project page on github. If you want to contribute, you can report any bugs, request new features or create bug fix requests. I am very excited about this project. I hope it helps you keep track of our ASIC miners, especially if you have a lot of them. Happy mining!!!
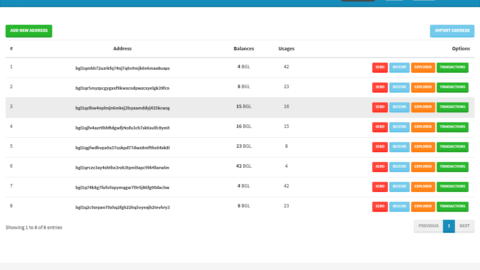
- Add as many miners as you want
- Supports A3, B3, D3, E3, L3, L3+, L3++, R4, S7, S9, S11, S17, S17 Pro, T9, T9+, T17, V9, X3, Z9 mini, Z11
- Check their hash rate, temperature, fan speed, chip status, HW Error Rate, Uptime
- Get notifications in app about miner errors (requires update)
- Record errors in a file
- Display overall hashrate grouped by model
- Password protected login page
Twitter:
Requirements
- Antminer Monitor requires Python to run. Both Python2 and Python3 are supported !!!
- Mac and Linux users have Python installed by default on their system
- Windows users can download Python from
** ATTENTION **While installing Python be sure to checkAdd python.exe to Pathin the stepCustomize PythonIf you don’t select this option you will probably face some errors while installing the requirements
Fresh Installation
- Download the latest official release of #AntminerMonitor from https://github.com/anselal/antminer-monitor/releases or the latest unofficial release from https://github.com/anselal/antminer-monitor/archive/master.zip
- Unzip the downloaded file in a folder of your preference
- Open a windows command prompt or a terminal and navigate to the folder where you unzipped the file using the
cdcommand e.g. If you unzipped the file in the folderC:\Users\foo\Downloads\antminer-monitor-mastertype the following command and press <Enter> cd C:\Users\foo\Downloads\antminer-monitor-master Your command prompt or terminal should now look likeC:\Users\foo\Downloads\antminer-monitor-master> - This step apply only to Mac users. If you are a Windows or Linux user continue to step 5. Mac users should run all the commands with sudo eg.
sudo python get_pip.pyInstallpipusing one of the following methods: 4.1 Downloadget-pip.pyfrom https://bootstrap.pypa.io/get-pip.py and save it insideantminer-monitor-master. Run the following command to install it: It will ask for the administrator password. Type it and press <Enter>. While typing your password you won’t see the characters on your screen. This is only for security measures. sudo python get_pip.py 4.2 Install pip usingeasy_install. Again it may ask for the administrator password. sudo easy_install pip - Install requirements (Mac users don’t forget
sudo)
python -m pip install -r requirements.txt
python manage.py create-db
Login Page
- Create admin user
python manage.py create-admin
Default creadentials are username: admin – password: antminermonitor. You can change the password from the settings menu.
Run the app
(Mac users don’t forget sudo)
python manage.py run -h 0.0.0.0 -p 5000
Fire up a browser and point it to http://localhost:5000 if you are running the app on the same machine OR http://<ip>:5000 if you are accesing the app from another machine on the same network, by replacing <ip> with the machine’s ip running AntminerMonitor.
Feel free to change the host (-h) and port (-p) parameters as needed by your setup.
You can set the host (-h) and port (-p) parameters in your .flaskenv file to avoid typing them when starting the app.
Development vs. Production mode
AntminerMonitor runs by default in development mode, using Flask’s development server. In development mode, this server provides an interactive debugger and will reload when code is changed.
To switch to production mode, edit .flaskenv and set FLASK_ENV="production"
Run AntminerMonitor as a service (systemd)
Edit antminermonitor.service and adjust it properly to your environment
As root, run the following:
# Copy file service file to systemd's system folder
cp antminermonitor.service /etc/systemd/system/
# That’s it. We can now start the service:
systemctl start antminermonitor
# And automatically get it to start on boot
systemctl enable antminermonitor

Read more:
 Firmware Awesome Miner for Antminer (Download Firmware ASIC)
  AwesomeMiner CPU/GPU/ASIC/FPGA: Download and Configure for Windows
 ![SmartMinerPRO+ (SMP+): new CPU/GPU GUI Miner [Download for Windows]](http://crypto-mining.blog/wp-content/uploads/2020/07/20911829-120x120.jpg) SmartMinerPRO+ (SMP+): new CPU/GPU/ASIC/FPGA GUI Miner [Download for Windows]
SmartMinerPRO+ (SMP+): new CPU/GPU/ASIC/FPGA GUI Miner [Download for Windows]  Overview of Bitmain Antminer X3 CryptoNight ASIC Miner
  APMinerTool – Download and Instructions for use Antminer Toolkit
 Ethminer 0.9.41-genoil-1.0.8: Download Ethereum miner for Windows/Linux